Showing posts with label Toddler crafts. Show all posts

Tuesday, May 27, 2014

DIY Toddler Activities Part 6

After a long weekend in the house, I keep wondering why Liam and I didn't get more DIY projects done, so now it is time to plan for next weekend!  Here are some of the great ideas that I have come across, please feel free to share any of your own activities as well!


Nature Names Craft

littlefamilyfun.com


This is such an excellent idea for teaching letters in names and for playing outside.  I love thus one.


Supplies
Cardstock
Glue
Nature items

Directions
Hand each person a brown paper lunch-sack or even a plastic bag
Go out in nature (your backyard, a park, campground, the beach, anywhere!) and find things that you can use to create the letters of your name: such as sticks, rocks, leaves, grass, pine needle, flowers, berries, shells, bark, dirt etc.
On a piece of cardstock, write your name (or have it prewritten).
Use glue to get your nature items to stick to each letter to spell your name!


Pasta & Beads Bracelets

Kiwicrate.com


Yay, we can finally use our Kool-Aid Dyed Pasta for fun :)


SuppliesPipe Cleaners
Pasta
Pony Beads

Directions
Start off with a loop fastened at the bottom of the pipe cleaner there is an end to catch the beads as you work.  Bead the pipe cleaners to make their bracelets! This activity also works on fine motor skills too: fitting the beads on the pipe cleaners.  Once you are about 3/4 of the way up the pipe cleaner, take the end of the pipe cleaner through the hole to latch them together and weave the excess pipe cleaner through the last bead.

Fire Truck Collage

busybeekidscrafts.com


My son has an insane love of all things firetruck.  In fact I am already planning his December birthday party to be firetruck themed.  So of course I had to jump at this opportunity when I cam across it.


Supplies
Printed Fire Truck Template (or you can freehand your own)
Construction paper
Glue
Scissors
Yellow Straws (or pipe cleaners)
Black paint and brush
Something sparkly for the light like sequins or glitter glue

Directions
Trace the template onto red construction paper and cut it out. Cut out the windows from the template (they will be white if you printed the template out on white paper). Glue the windows in place on the red fire truck and glue the fire truck onto a piece of construction paper.
Use straws (or pipe cleaners) to make the ladder. Cut two long pieces for the sides, and small pieces for the rungs. Glue in place on your fire truck.
Glue something glittery to the top of the truck for the flashing light. You can use a glittery pom pom, a few sequins or glitter glue. 
Now it's time to paint on the wheels with black paint! If you don't want to use paint in your collage you can also cut wheels from black paper to stick on, or you can buy self-adhesive foam and just stick the wheels on!


Salt Painting

http://jugglingwithkids.com
This is a great and easy way to have a fun painting time at home with not too much of a mess.  I have seen a lot of people try this and similar things out in the past and have been wanting to try it with Liam since he is totally into creating different works of art. 
I keep wanting to do this one and find that I need to buy salt haha.


Supplies
-Construction paper/cardstock
-Paintbrush and/or medicine dropper
-Colored water (we used about a tablespoon of water with 6-7 drops of food coloring)
-Salt
-Glue
-Little bowls for colored water


Directions
Have your child draw a picture with glue.Then sprinkle the glue with salt.  We did this on top of a piece of cardboard, but a baking sheet will work well too. Next have your child take a paintbrush or a medicine dropper and drop colored water, one drop at a time onto the salt.
Some tips: Make sure they lightly touch the salt with the brush.  It also helps to have a bowl to clean the brush in between colors...otherwise you lose the colors start blending together and you lose the vibrant colors because they become murky. 


If you would like to see the past DIY activities that we have completed together, check them out here:

Homemade Liquid Sidewalk Chalk

Penguin Activity Game

Kool-Aid Dyed Pasta

Cardboard Owls

Alphabet Train

Make Your Own Rainstorm

Orange Sugar Scrub

Meditation Bottle

Sunday, May 11, 2014

Homemade Liquid Sidewalk Chalk: DIY for Kids

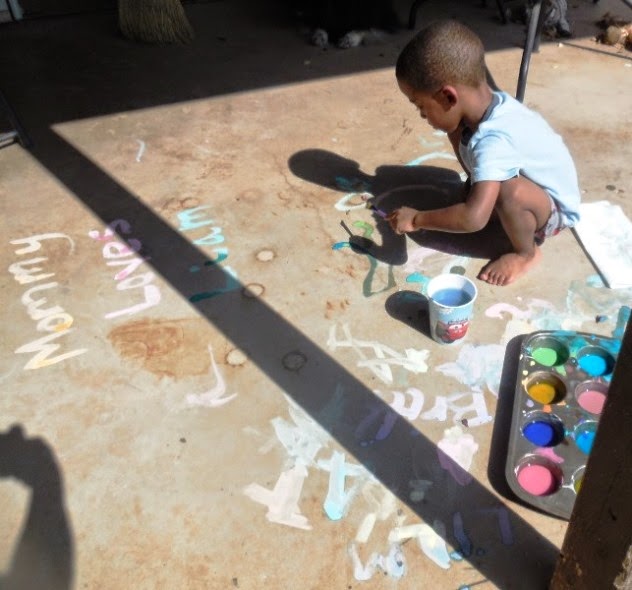
My son (Liam) loves sidewalk chalk and painting, so this was a fantastic and easy way to put both of those things together.  It was really easy to make and we had so much fun.  I was a little hesitant about what it would look like when it dried, but it still shows very clearly!  Such a great thing to try!

Ingredients:
1 Cup Water
1 Cup Cornstarch
Muffin Tin
Food Coloring
*Paint Brush(es)


Directions:
Mix the water and cornstarch and then pour into a muffin tin or small cups.  Add food coloring to make the colors and stir.  Now paint.
*I suggest also taking a cup of water and a paper towel outside with you to wash your brush in between colors.


Get your supplies set up
Pour the water into a mixing bowl
Add the cornstarch

Stir it together
Once it is mixed thoroughly you can get ready to pour it into the muffin tin
Pour the mixture into the muffin tin
Add a couple drops of food coloring to each cup
Stir them together to mix the color into the chalk paint
Have fun making some of your own colors also
Go outside and start painting!
Cheer with glee at how fun it is
Draw a pretty picture
Add in some snakes (Here you can see how the chalk shows up once it is dry)


If you would like to see our past DIY activities, check them out here:

Ombre' Egg Dying

Penguin Learning Game

Kool-Aid Dyed Pasta

Cardboard Owls

Alphabet Train

Make Your Own Rainstorm

Orange Sugar Scrub

Meditation Bottle

Tuesday, April 29, 2014

DIY: Toddler Crafts Part 5

As we are nearing the end of the month I thought it was time to throw out some new toddler DIY activities!  I hope you enjoy them I have spent a lot of time scouring the Internet for some great new ideas we haven't used before.  Please feel free to submit any of your ideas that you may have for future blogs.

Rainbow Bubble Snake

Housingaforest.com


It's fun, it's easy and it's bubbles, Liam will love it!


Ingredients:
Empty Water Bottle
Duct Tape or Rubber Band
Sock
Dish Soap
Food Coloring

Directions:
Start by cutting the bottom of the water bottle off.  Next slide the sock over the bottom of the bottle. You can  use duct tape or a rubber band to secure the sock. Pour some dish soap into a shallow container with a little bit of water and gently mix.  Dip the sock covered bubble blower into the solution and gently blow.  If you want to add some color you can drop the food coloring onto the sock. 
Please remind your kids to blow air out not suck air in!  If your child sucks in, they will be eating bubbles.  Please be careful when doing this with your kids.  My kids had a blast playing with these bubble snakes.  We did not have any trouble with the kids inhaling, but I have had a few readers mention that their younger kids needed continual reminders.  The fun will quickly end if the bubbles are inhaled!


Liquid Sidewalk Chalk

Domesticcharm.blogspot.com


Sidewalk Chalk is so fun and messy for outside play, this looks like a great one to try.


Ingredients:
1 Cup Water
1 Cup Cornstarch
Muffin Tin
Food Coloring


Directions:
Mix the water and cornstarch and then pour into a muffin tin or small cups.  Add food coloring to make the colors.  Now paint.

 Homemade Lava Lamp

slsmithphotograpy.com


I LOVE lava Lamps, so this is one I definitely want to try


Ingredients:
Empty Water Bottle
Food Coloring
Vegetable Oil
Water
Alka Seltzer


Directions:
Fill each bottle about 2/3 with the oil.  Fill the rest of the way with water leaving about an inch of air to the top.  Add 10 drops of food coloring.  Break the Alka Seltzer into 4 pieces.  Drop the pieces in one at a time.  *Wait until the bubbles stop before adding in another piece or it will start to get cloudy.  

Pasta & Beads Bracelets

Kiwicrate.com


Yay, we can finally use our Kool-Aid Dyed Pasta for fun :)


Ingredients:
Pipe Cleaners
Pasta
Pony Beads

Directions:
Start off with a loop fastened at the bottom of the pipe cleaner there is an end to catch the beads as you work.  Bead the pipe cleaners to make their bracelets! This activity also works on fine motor skills too: fitting the beads on the pipe cleaners.  Once you are about 3/4 of the way up the pipe cleaner, take the end of the pipe cleaner through the hole to latch them together and weave the excess pipe cleaner through the last bead.

If you would like to see the past DIY activities that we have completed together, check them out here:

Penguin Activity Game

Kool-Aid Dyed Pasta

Cardboard Owls

Alphabet Train

Make Your Own Rainstorm

Orange Sugar Scrub

Meditation Bottle