Showing posts with label DIY. Show all posts

Monday, September 1, 2014

DIY Toddler Activity Ideas Part 7

It has been another long weekend that I wish I would have made more time to accomplish some DIY projects.  Here are some of the great ideas that I have come across, please feel free to share any of your own activities as well!

Toilet Paper Leaf Stamps

crafty morning


This is a great activity now that September is here, and it is easy and fun looking :)  


Materials:
Toilet Paper Roll
Paints
Paper 
Printable fall tree sheet (or draw your own tree)
Tape
Scissors

Directions:
Start by cutting an empty toilet paper roll down the middle and continue cutting until it makes a small leaf shape. Bend the edges to get the corners pointy and tape it together.
Print out the tree sheet and cut that same toilet roll into three parts so they can be used for each color paint.
Once once all of the leaves are stamped you can use a small paintbrush to color in the leaves. You can also add more leaves at the bottom of the tree to make it look like they fell off.

 Alphabet Fossils

playdough to plato


This looks like such an amazing fun time.  I  really want to do this with Liam.


Ingredients:
1 cup flour
1/2 cup salt
1/2 cup water
Rolling pin
Cookie sheet
Magnetic Alphabet Stamps (such as would be on the fridge)
Paint Brush
Container with Sand
*Dinosaur Toys

Directions:
Preheat the oven to 250° F.
Mix together salt, flour, and water until dough is formed.
Knead the dough on a floured surface until the mixture is elastic and smooth. If dough is too sticky, sprinkle with flour, continue to do so until stickiness is gone. *Do not add too much flour, as this will dry out the dough and will cause it to crack before you get a chance to bake it.
Roll out the dough to about 1/4” thick with a rolling pin that has been dusted with flour.
Use the Letter stamps to imprint each letter, or you can also use a toothpick to create them.
Bake for 2 hours and allow to cool completely before using.  *If you don't want to bake them you can also leave them out for a good 3 days to dry completely. 

You can then bury the letter fossils and any additional dinosaur toys and allow your child to excavate for them.  The paint brush is useful for brushing off any remaining sand. 
You can then place them in alphabetical order or use them to spell words.

 Homemade Lava Lamp

slsmithphotograpy.com


I LOVE lava Lamps, so this is one I definitely want to try


Ingredients:
Empty Water Bottle
Food Coloring
Vegetable Oil
Water
Alka Seltzer

Directions:
Fill each bottle about 2/3 with the oil.  Fill the rest of the way with water leaving about an inch of air to the top.  Add 10 drops of food coloring.  Break the Alka Seltzer into 4 pieces.  Drop the pieces in one at a time.  *Wait until the bubbles stop before adding in another piece or it will start to get cloudy.  

Nature Names Craft

littlefamilyfun.com

This is such an excellent idea for teaching letters in names and for playing outside.  I love thus one.


Supplies
Cardstock
Glue
Nature items

Directions
Hand each person a brown paper lunch-sack or even a plastic bag
Go out in nature (your backyard, a park, campground, the beach, anywhere!) and find things that you can use to create the letters of your name: such as sticks, rocks, leaves, grass, pine needle, flowers, berries, shells, bark, dirt etc.
On a piece of cardstock, write your name (or have it prewritten).
Use glue to get your nature items to stick to each letter to spell your name!


If you would like to see the past DIY activities that we have completed together, check them out here:

Jello Ocean Bath

Homemade Liquid Sidewalk Chalk

Penguin Activity Game

Kool-Aid Dyed Pasta

Cardboard Owls

Alphabet Train

Make Your Own Rainstorm

Orange Sugar Scrub

Meditation Bottle

Saturday, July 12, 2014

Jello Ocean Bath: DIY Kid's Activity

 Messy activities in the bath are such a fantastic idea.  You get to be all messy and yet you don't have a huge mess to clean up!  Also if the mess is too much, just rinse it out and then wash your child up as they are already in the bathtub playing!  Liam loves the bathtub anyway, so I knew he would love this activity!  I have found it to be quite the ordeal to find blue raspberry jello, so I had to search for awhile to get enough boxes to do this activity; I ended up adding in a lime jello for good measure.  Liam had such a blast and played for over an hour in it.  He was a little sad when the jello fully dissolved into the water.  The only drawback I found was that his feet, hands and knees were semi-dyed blue for most of the day but after his bath at bedtime it's almost completely gone.


Supplies:
4-5 Boxes Blue Raspberry Jello
Small bag of Smooth Round Stones (Such as used for candle accents)
Variety of sea life toys

Directions:
Mix the jello together.  Let the jello set up.  Put it into the bottom of the tub and add some warm water to make the bath warm enough to play in.  Add the stones and toys and let them get in and have a ball.  This makes for a great sensory and learning experience!

Pour the jello into a large mixing bowl
Add the hot water (according to amount on the box) and stir

Let the jello set in the fridge
Put the jello in the bathtub and add some warm water, rocks and ocean themes toys

My son playing in the "ocean"
He thought it was so fun and squishy
Trying to save all of the jello from dissolving
Jello collecting


If you would like to see our past DIY activities, check them out here:

Homemade Liquid Sidewalk Chalk

Ombre' Egg Dying

Penguin Learning Game

Kool-Aid Dyed Pasta

Cardboard Owls

Alphabet Train

Make Your Own Rainstorm

Orange Sugar Scrub

Meditation Bottle

Tuesday, May 27, 2014

DIY Toddler Activities Part 6

After a long weekend in the house, I keep wondering why Liam and I didn't get more DIY projects done, so now it is time to plan for next weekend!  Here are some of the great ideas that I have come across, please feel free to share any of your own activities as well!


Nature Names Craft

littlefamilyfun.com


This is such an excellent idea for teaching letters in names and for playing outside.  I love thus one.


Supplies
Cardstock
Glue
Nature items

Directions
Hand each person a brown paper lunch-sack or even a plastic bag
Go out in nature (your backyard, a park, campground, the beach, anywhere!) and find things that you can use to create the letters of your name: such as sticks, rocks, leaves, grass, pine needle, flowers, berries, shells, bark, dirt etc.
On a piece of cardstock, write your name (or have it prewritten).
Use glue to get your nature items to stick to each letter to spell your name!


Pasta & Beads Bracelets

Kiwicrate.com


Yay, we can finally use our Kool-Aid Dyed Pasta for fun :)


SuppliesPipe Cleaners
Pasta
Pony Beads

Directions
Start off with a loop fastened at the bottom of the pipe cleaner there is an end to catch the beads as you work.  Bead the pipe cleaners to make their bracelets! This activity also works on fine motor skills too: fitting the beads on the pipe cleaners.  Once you are about 3/4 of the way up the pipe cleaner, take the end of the pipe cleaner through the hole to latch them together and weave the excess pipe cleaner through the last bead.

Fire Truck Collage

busybeekidscrafts.com


My son has an insane love of all things firetruck.  In fact I am already planning his December birthday party to be firetruck themed.  So of course I had to jump at this opportunity when I cam across it.


Supplies
Printed Fire Truck Template (or you can freehand your own)
Construction paper
Glue
Scissors
Yellow Straws (or pipe cleaners)
Black paint and brush
Something sparkly for the light like sequins or glitter glue

Directions
Trace the template onto red construction paper and cut it out. Cut out the windows from the template (they will be white if you printed the template out on white paper). Glue the windows in place on the red fire truck and glue the fire truck onto a piece of construction paper.
Use straws (or pipe cleaners) to make the ladder. Cut two long pieces for the sides, and small pieces for the rungs. Glue in place on your fire truck.
Glue something glittery to the top of the truck for the flashing light. You can use a glittery pom pom, a few sequins or glitter glue. 
Now it's time to paint on the wheels with black paint! If you don't want to use paint in your collage you can also cut wheels from black paper to stick on, or you can buy self-adhesive foam and just stick the wheels on!


Salt Painting

http://jugglingwithkids.com
This is a great and easy way to have a fun painting time at home with not too much of a mess.  I have seen a lot of people try this and similar things out in the past and have been wanting to try it with Liam since he is totally into creating different works of art. 
I keep wanting to do this one and find that I need to buy salt haha.


Supplies
-Construction paper/cardstock
-Paintbrush and/or medicine dropper
-Colored water (we used about a tablespoon of water with 6-7 drops of food coloring)
-Salt
-Glue
-Little bowls for colored water


Directions
Have your child draw a picture with glue.Then sprinkle the glue with salt.  We did this on top of a piece of cardboard, but a baking sheet will work well too. Next have your child take a paintbrush or a medicine dropper and drop colored water, one drop at a time onto the salt.
Some tips: Make sure they lightly touch the salt with the brush.  It also helps to have a bowl to clean the brush in between colors...otherwise you lose the colors start blending together and you lose the vibrant colors because they become murky. 


If you would like to see the past DIY activities that we have completed together, check them out here:

Homemade Liquid Sidewalk Chalk

Penguin Activity Game

Kool-Aid Dyed Pasta

Cardboard Owls

Alphabet Train

Make Your Own Rainstorm

Orange Sugar Scrub

Meditation Bottle

Sunday, May 11, 2014

Homemade Liquid Sidewalk Chalk: DIY for Kids

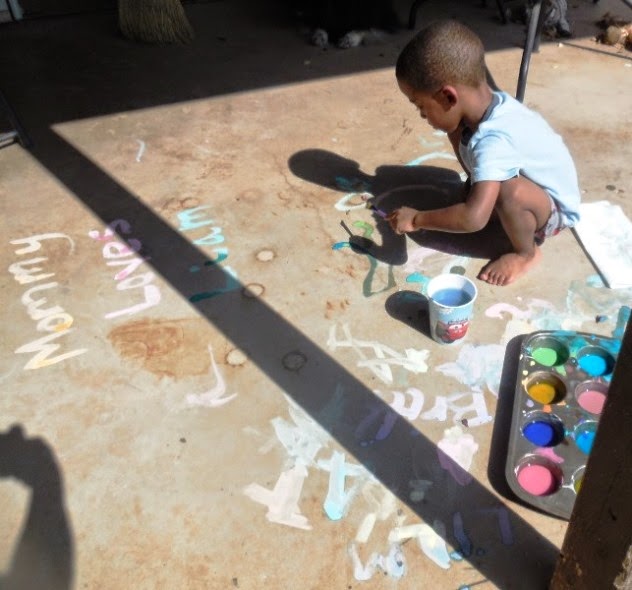
My son (Liam) loves sidewalk chalk and painting, so this was a fantastic and easy way to put both of those things together.  It was really easy to make and we had so much fun.  I was a little hesitant about what it would look like when it dried, but it still shows very clearly!  Such a great thing to try!

Ingredients:
1 Cup Water
1 Cup Cornstarch
Muffin Tin
Food Coloring
*Paint Brush(es)


Directions:
Mix the water and cornstarch and then pour into a muffin tin or small cups.  Add food coloring to make the colors and stir.  Now paint.
*I suggest also taking a cup of water and a paper towel outside with you to wash your brush in between colors.


Get your supplies set up
Pour the water into a mixing bowl
Add the cornstarch

Stir it together
Once it is mixed thoroughly you can get ready to pour it into the muffin tin
Pour the mixture into the muffin tin
Add a couple drops of food coloring to each cup
Stir them together to mix the color into the chalk paint
Have fun making some of your own colors also
Go outside and start painting!
Cheer with glee at how fun it is
Draw a pretty picture
Add in some snakes (Here you can see how the chalk shows up once it is dry)


If you would like to see our past DIY activities, check them out here:

Ombre' Egg Dying

Penguin Learning Game

Kool-Aid Dyed Pasta

Cardboard Owls

Alphabet Train

Make Your Own Rainstorm

Orange Sugar Scrub

Meditation Bottle

Tuesday, April 29, 2014

DIY: Toddler Crafts Part 5

As we are nearing the end of the month I thought it was time to throw out some new toddler DIY activities!  I hope you enjoy them I have spent a lot of time scouring the Internet for some great new ideas we haven't used before.  Please feel free to submit any of your ideas that you may have for future blogs.

Rainbow Bubble Snake

Housingaforest.com


It's fun, it's easy and it's bubbles, Liam will love it!


Ingredients:
Empty Water Bottle
Duct Tape or Rubber Band
Sock
Dish Soap
Food Coloring

Directions:
Start by cutting the bottom of the water bottle off.  Next slide the sock over the bottom of the bottle. You can  use duct tape or a rubber band to secure the sock. Pour some dish soap into a shallow container with a little bit of water and gently mix.  Dip the sock covered bubble blower into the solution and gently blow.  If you want to add some color you can drop the food coloring onto the sock. 
Please remind your kids to blow air out not suck air in!  If your child sucks in, they will be eating bubbles.  Please be careful when doing this with your kids.  My kids had a blast playing with these bubble snakes.  We did not have any trouble with the kids inhaling, but I have had a few readers mention that their younger kids needed continual reminders.  The fun will quickly end if the bubbles are inhaled!


Liquid Sidewalk Chalk

Domesticcharm.blogspot.com


Sidewalk Chalk is so fun and messy for outside play, this looks like a great one to try.


Ingredients:
1 Cup Water
1 Cup Cornstarch
Muffin Tin
Food Coloring


Directions:
Mix the water and cornstarch and then pour into a muffin tin or small cups.  Add food coloring to make the colors.  Now paint.

 Homemade Lava Lamp

slsmithphotograpy.com


I LOVE lava Lamps, so this is one I definitely want to try


Ingredients:
Empty Water Bottle
Food Coloring
Vegetable Oil
Water
Alka Seltzer


Directions:
Fill each bottle about 2/3 with the oil.  Fill the rest of the way with water leaving about an inch of air to the top.  Add 10 drops of food coloring.  Break the Alka Seltzer into 4 pieces.  Drop the pieces in one at a time.  *Wait until the bubbles stop before adding in another piece or it will start to get cloudy.  

Pasta & Beads Bracelets

Kiwicrate.com


Yay, we can finally use our Kool-Aid Dyed Pasta for fun :)


Ingredients:
Pipe Cleaners
Pasta
Pony Beads

Directions:
Start off with a loop fastened at the bottom of the pipe cleaner there is an end to catch the beads as you work.  Bead the pipe cleaners to make their bracelets! This activity also works on fine motor skills too: fitting the beads on the pipe cleaners.  Once you are about 3/4 of the way up the pipe cleaner, take the end of the pipe cleaner through the hole to latch them together and weave the excess pipe cleaner through the last bead.

If you would like to see the past DIY activities that we have completed together, check them out here:

Penguin Activity Game

Kool-Aid Dyed Pasta

Cardboard Owls

Alphabet Train

Make Your Own Rainstorm

Orange Sugar Scrub

Meditation Bottle

Saturday, April 19, 2014

DIY: Ombre' Egg Dying

After a failed attempt at shaving cream dyed eggs last Easter, I was very excited about the Ombre' style Egg Dying.  I figured that it looked really awesome and really easy and almost foolproof...  Apparently the "almost" was the key word for me.  As I only own gel food coloring it seems to be the bane of my egg dying existence, and once again was ineffective in this year's egg dying.  The ombre' method theoretically should work but given the directions that I came across it did not work for me.  I suggest using regular food coloring that is not as thick or as vibrant and not wasting a ton of good gel food coloring on this.  

Supplies:
Hard Boiled Eggs
Food Coloring(not gel)
Cups

Instructions:
Place eggs into cups or containers that will allow them to sit upright.  Add enough warm water to cover about a quarter of the egg.  Add enough food coloring for the color to show darkly in the water.  Let sit 10 minutes and then add enough water so that the eggs are now half covered.  Let sit for another 10 minutes and cover up to the 3/4 mark.  Sit for another 10 minutes and cover completely.  After 5 minutes of total immersion you can remove to dry. 
*Keep in mind that 40 additional minutes in warm water may cook the egg yolk a bit more.


Get some cups to put your eggs in and fill them up 1/4 of the way up the egg
Take a minute for an assistant pose :)
Add food coloring carefully to the water so that it is dark enough to show through the water

After 10 minutes add water up to the 1/2 mark on your egg (this did cause my pink egg to fall)
Be excited about the process
After 10 additional minutes add water up to the 3/4 line on the eggs
After 10 minutes cover completely
Remove to dry

Be happy about how pretty your eggs look
You can see some separation lines on a few but the ombre' effect was not there for me, at least they are still pretty

Tuesday, April 1, 2014

Penguin Activity Game: DIY Toddler Activity

When I first came across this "Feed the Penguin" game I was so excited to make it!  My son is totally into Penguins, thanks to the Swedish clay-mation show Pingu.  I also loved that you can use the fish for learning.  Since associating letters with words that start with the letter is a lot of fun for Liam (my son) right now, I decided to go with ABCs but you can also use numbers or shapes or words or pictures or whatever you can possibly come up with.  Admittedly, this activity did require a bit more parental help than some of the other projects that we have done, but my son was still able to be a constant part of the process and he has had SO much fun with the actual finished product.  I hope that you can enjoy it as much as we have so far!

Supplies:
Cardboard Box (about Graham Cracker box sized)
Construction Paper (Black, White, Orange)
Goggle Eyes (2)
Scissors
Tape (use good quality tape so that your wings stay attached)
Glue
Knife
*Optional: Glitter Glue (My son loves this stuff so we wrote out letters using it)

Directions:
Wrap the black construction paper around the box and tape it on. I only used 1 piece, so it didn't cover the top, bottom or the back of the box. But you can if you want to. 
Cut an oval shaped hole for the mouth with the knife.  Initially I tried to use scissors, but a knife worked SO much better. It doesn't have to be perfect, just big enough for the fish to fit in.  (You'll want to leave paper off the top of the box so that you can get the fish out after they get fed to the penguin.)
For the beak, cut a square out of orange construction paper. Then cut an oval shaped hole in the middle.  I found this was easiest with measuring it close to the hole that had previously been cut for the mouth.  Tape the beak onto the penguin.
Glue 2 googly eyes on the penguin (or cut eyes out of paper and glue them on).
Cut out a white oval for the stomach and glue it on.
Cut out 2 orange feet and glue them onto the bottom of the box.
Cut out 2 black, oval flaps for the wings and tape one on each side.

For the FISH:
Just draw a fish shape (easiest to draw an oval body with a triangle tail attached) onto a piece of paper and cut it out (Make sure it's small enough to fit in your penguin's mouth). Then use that fish as a template and draw some more fish on a piece of construction paper. Then place 2-3 MORE pieces of construction paper underneath and cut out the fish. (Saves time cutting out 3-4 at a time!)
Once you have all your fish, get a black marker and draw a dot for the eye and a little smile on each fish.
Then draw on whatever concept you want to teach: SHAPES, NUMBERS, LETTERS, MATH, WORDS, etc.  Because we used Glitter Glue to write out letters, I let them sit over night to dry completely. 
*Optional: For extra durability you can laminate (or use contact paper on) the fish so you can use them in other games later


Get your supplies out (don't mind the paint haha)
Wrap your box in black paper

Cut a mouth hole in the box with a knife
Cut a an orange square and an oval middle for the mouth and tape onto the box for the beak
Glue the Googly Eyes on
Showcase your gluing skills with glee
Clean up any excess glue

Cut an Oval out of white paper for the belly and glue it on
Check out how awesome it is looking so far
Cut out little orange feet
Glue the feet onto the bottom of the box
Cut out 2 long ovals for the wings and tape them on
Check out the finished penguin box in all it's glory

Cut out your fishies! 
Draw on an eye and a smile and write on whatever you would like, we did letters

If you would like to see our past DIY activities, check them out here:

Kool-Aid Dyed Pasta

Cardboard Owls

Alphabet Train

Make Your Own Rainstorm

Orange Sugar Scrub

Meditation Bottle